
Machine Authorization Problems

To authenticate your license of Serum 2, you need to open the plugin in your Digital Audio Workstation and open the plugin's editor. You will need to login using your https://xferrecords.com credentials. If you forgot your credentials, you can try to reset your password here.
Serum 1 serials (license codes) won't activate Serum 2, but don't worry! You just need to authorize your computer using your Xfer account.
You cannot authorize an unlimited amount of machines and accounts aren't meant to be shared. If you were to run out of machine authorizations, please contact support so we can look into your specific case (you can see and manage your activations in your account page).
If you see an error message telling you that you don't own Serum 2, it might mean that you are logged in with a different account on the website. Please log out from https://xferrecords.com/ (click on your profile and choose sign out) and login again with your account containing the Serum 2 purchase.
Then try the authorization process one more time.
Offline activation
If one of your devices is not connected to the internet but you would like to authorize it, install and start Serum 2 on that device and you will be provided with a Machine ID.
Go to https://xferrecords.com/my_account and choose the offline authorization option. Note that you might need to deauthorize existing devices if you run out of authorizations. Download the license and provide it to Serum 2 on your offline device for activation.
Installing Serum
- Download the installer from your account page on Xfer's site or from the Splice client if you use Rent to Own.
- Run the full version installer.
- Restart your DAW.
(WINDOWS OS):
- If you are unfamiliar with VST Plugins, you need to create/have a VSTPlugins folder.
- I personally use C:\VSTPlugins but you can make the folder elsewhere.
- Install Serum VST to this location when running the installer.
- In your DAW, you need to set it to look for VST Plugins at this location.
in FL Studio: -> Options ->Manage Plugins, and add a Search Path in top-left to your VST folder location (e.g. C:\VSTPlugins) containing Serum.dll / Serum_x64.dll
(Windows) Ableton Live 10: -> Preferences -> Plugins, enable "VST2 Custom Folder" and set the VST2 Custom Folder location to the folder containing Serum_x64.dll

(MacOS) Ableton Live 10 : -> Preferences -> Plugins, enable "Use VST2 System Folders"

Adding Serum to Ableton
- Download the Serum installer (choose full installer if you've never installed Serum) from your account page.
- Ableton's VST/AU settings need to be properly set to find the plugin, for that navigate to Ableton's Options > Preferences > Plug-ins (Preferences > File and Folder in Live versions prior to 10.1).
- Mac users need to make sure "Use AudioUnits/VST" are all checked and hit Rescan.

Windows users need to turn on the "Use VST2 Plug-In custom folder option and click on the Browse button for the "VST2 Plugin Custom Folder" then navigate to the location you installed Serum. (When you install Serum it asks for a VST 64-bit destination. This installs a Serum_x64.dll file into that selected folder. )
- VST2 plugins don't have a default installation location on Windows. Common locations users choose for VST2 installation:
- C:\VSTPlugins
- C:\Program Files\Steinberg\VSTPlugins
- C:\Program Files\Common Files\VST2
- C:\Program Files\Common Files\Steinberg\VST2
VST3 / AAX Windows/macOS
The latest pre-release update for LFO Tool is needed on windows and macOS for the latest VST3/AAX support on both windows and macOS.This link is available to customers. Sign into "your account" to access the update.
https://xferrecords.com/forums/lfo-tool/beta-version-1-805-pre-release-with-vst3-support
Restart your machine entirely and run the update before opening the DAW.
WindowsOS
The LFOTool_x64.dll and LFOTool.vst3 should be installed to their respective folder locations set in the DAW.
macOS
The LFO Tool VST2/VST3/AU/AAX will install to their folders automatically unless specified otherwise by the user.
Nerve Installation
Nerve OS X - NEW USER
1) If you installed the demo, you will want to delete NerveDemoData folder which is:
command-shift-G in Finder (go to folder) and type or paste:
/Library/Audio/Presets/Xfer Records/
2) Download this 1.0 DMG so you have the content (NerveData Folder): *Do not manually install (bother with) the 1.0 plug-ins on the DMG, just the NerveData folder*
3) Download the latest version from "Your Account" and install this second.
*The latest update found atop the Nerve forum is required for the latest macOS.
4) Your Serial Number is under "Your Account".
1/Big Sur/Monterey
The beta atop the Nerve Forum is required and can be accessed by registered users.
https://xferrecords.com/forums/nerve/nerve-1-275-pre-release
If you are installing Nerve for the first time then it is recommended to copy the Nerve Data Folder to the user Music folder.
command-shift-G in Finder and type or paste:
~/Music
Move NerveData Folder to this location.
Plugins from the 1.0 disk image will need to removed if they were installed.
command-shift-G in Finder (go to folder) and type or paste:
~/Library/Audio/Plug-Ins
Delete Nerve from these locations.
How do I import 3rd party presets in to Serum?
You should be importing as follows: 1) In Serum: Menu->Show Serum Presets Folder 2) put the presets you want in a folder inside the now-visible "Presets" subfolder 3) Back in Serum: Menu->Rescan folders on disk then they should appear in the menu/browser.
Plugins Folder Missing" message appears on Serum.
Serum is not able to find your presets folder. It might due to a few reasons and the folder might have been relocated.
If you know where your presets folder is located, then point to it (On windows, the folder is in Documents\Xfer by default)
If you don't know where your presets folder is located, the easiest thing is to reinstall the FULL version of Serum and restart your DAW. At this point, Serum should work and you can decide to relocate the folder and point Serum to the new location of your choosing.
Note: some older versions of Serum had a bug when the presets folder was installed in a path with unicode characters, for instance if the computer's user name was in Japanese, Arabic, Hebrew or any languages not using ASCII characters. If you encounter this issue, please update Serum or move the presets folder to a path without unicode characters.
macOS:
If migrating computers, it is possibly a permissions issue:
open /Applications/Utilities/Terminal.app paste this next line in the Terminal window:
sudo chmod -R 777 /Library/Audio/Presets/Xfer\ Records/
It will prompt for your (computer) password, the letters will not appear as you type, press return, and you're done.
Where to find SerumFX?
SerumFX is a bonus plugin available to customers. You can download it from your account/Serum page.

In the case of Splice rent-to-own, it is available once payments begin (after the 3-day trial period). You can find it on Splice under https://splice.com/plugins/your-plugins. See their support page on this topic.
Alternatively, you could use "forgot your password" on the Sign-in page on this website to the email you started the lease under (the email you use for your Splice account) - once logged in, you will find SerumFX in "your account".
Serum 2 Preset Previews
Serum 2 introduces new play buttons in the presets browser that users can use to quickly and easily preview presets. This makes the process of selecting presets more intuitive and enjoyable.

Fallback Previews
By default, Serum 2 plays a "fallback preview" when the preset creator hasn't provided a custom preview. While functional, this fallback preview can become monotonous for users, especially when navigating through multiple presets. The solution is custom preset previews.
The Importance of Custom Preset Previews
Custom preset previews provide users with a sense of the intended use or character of a preset. Even a simple note or pattern can communicate the creator’s vision, which is valuable given the diverse use cases of presets.
Custom previews enhance user experience by:
- Demonstrating the preset’s potential in context
- Offering a consistent point of reference
- Helping users make quicker and more informed decisions
Creating Custom Previews for Presets
To create and set a custom preview for a preset in Serum 2:
- Enable the CLIP module.
- Click the CLIP label (to the left of the keyboard).
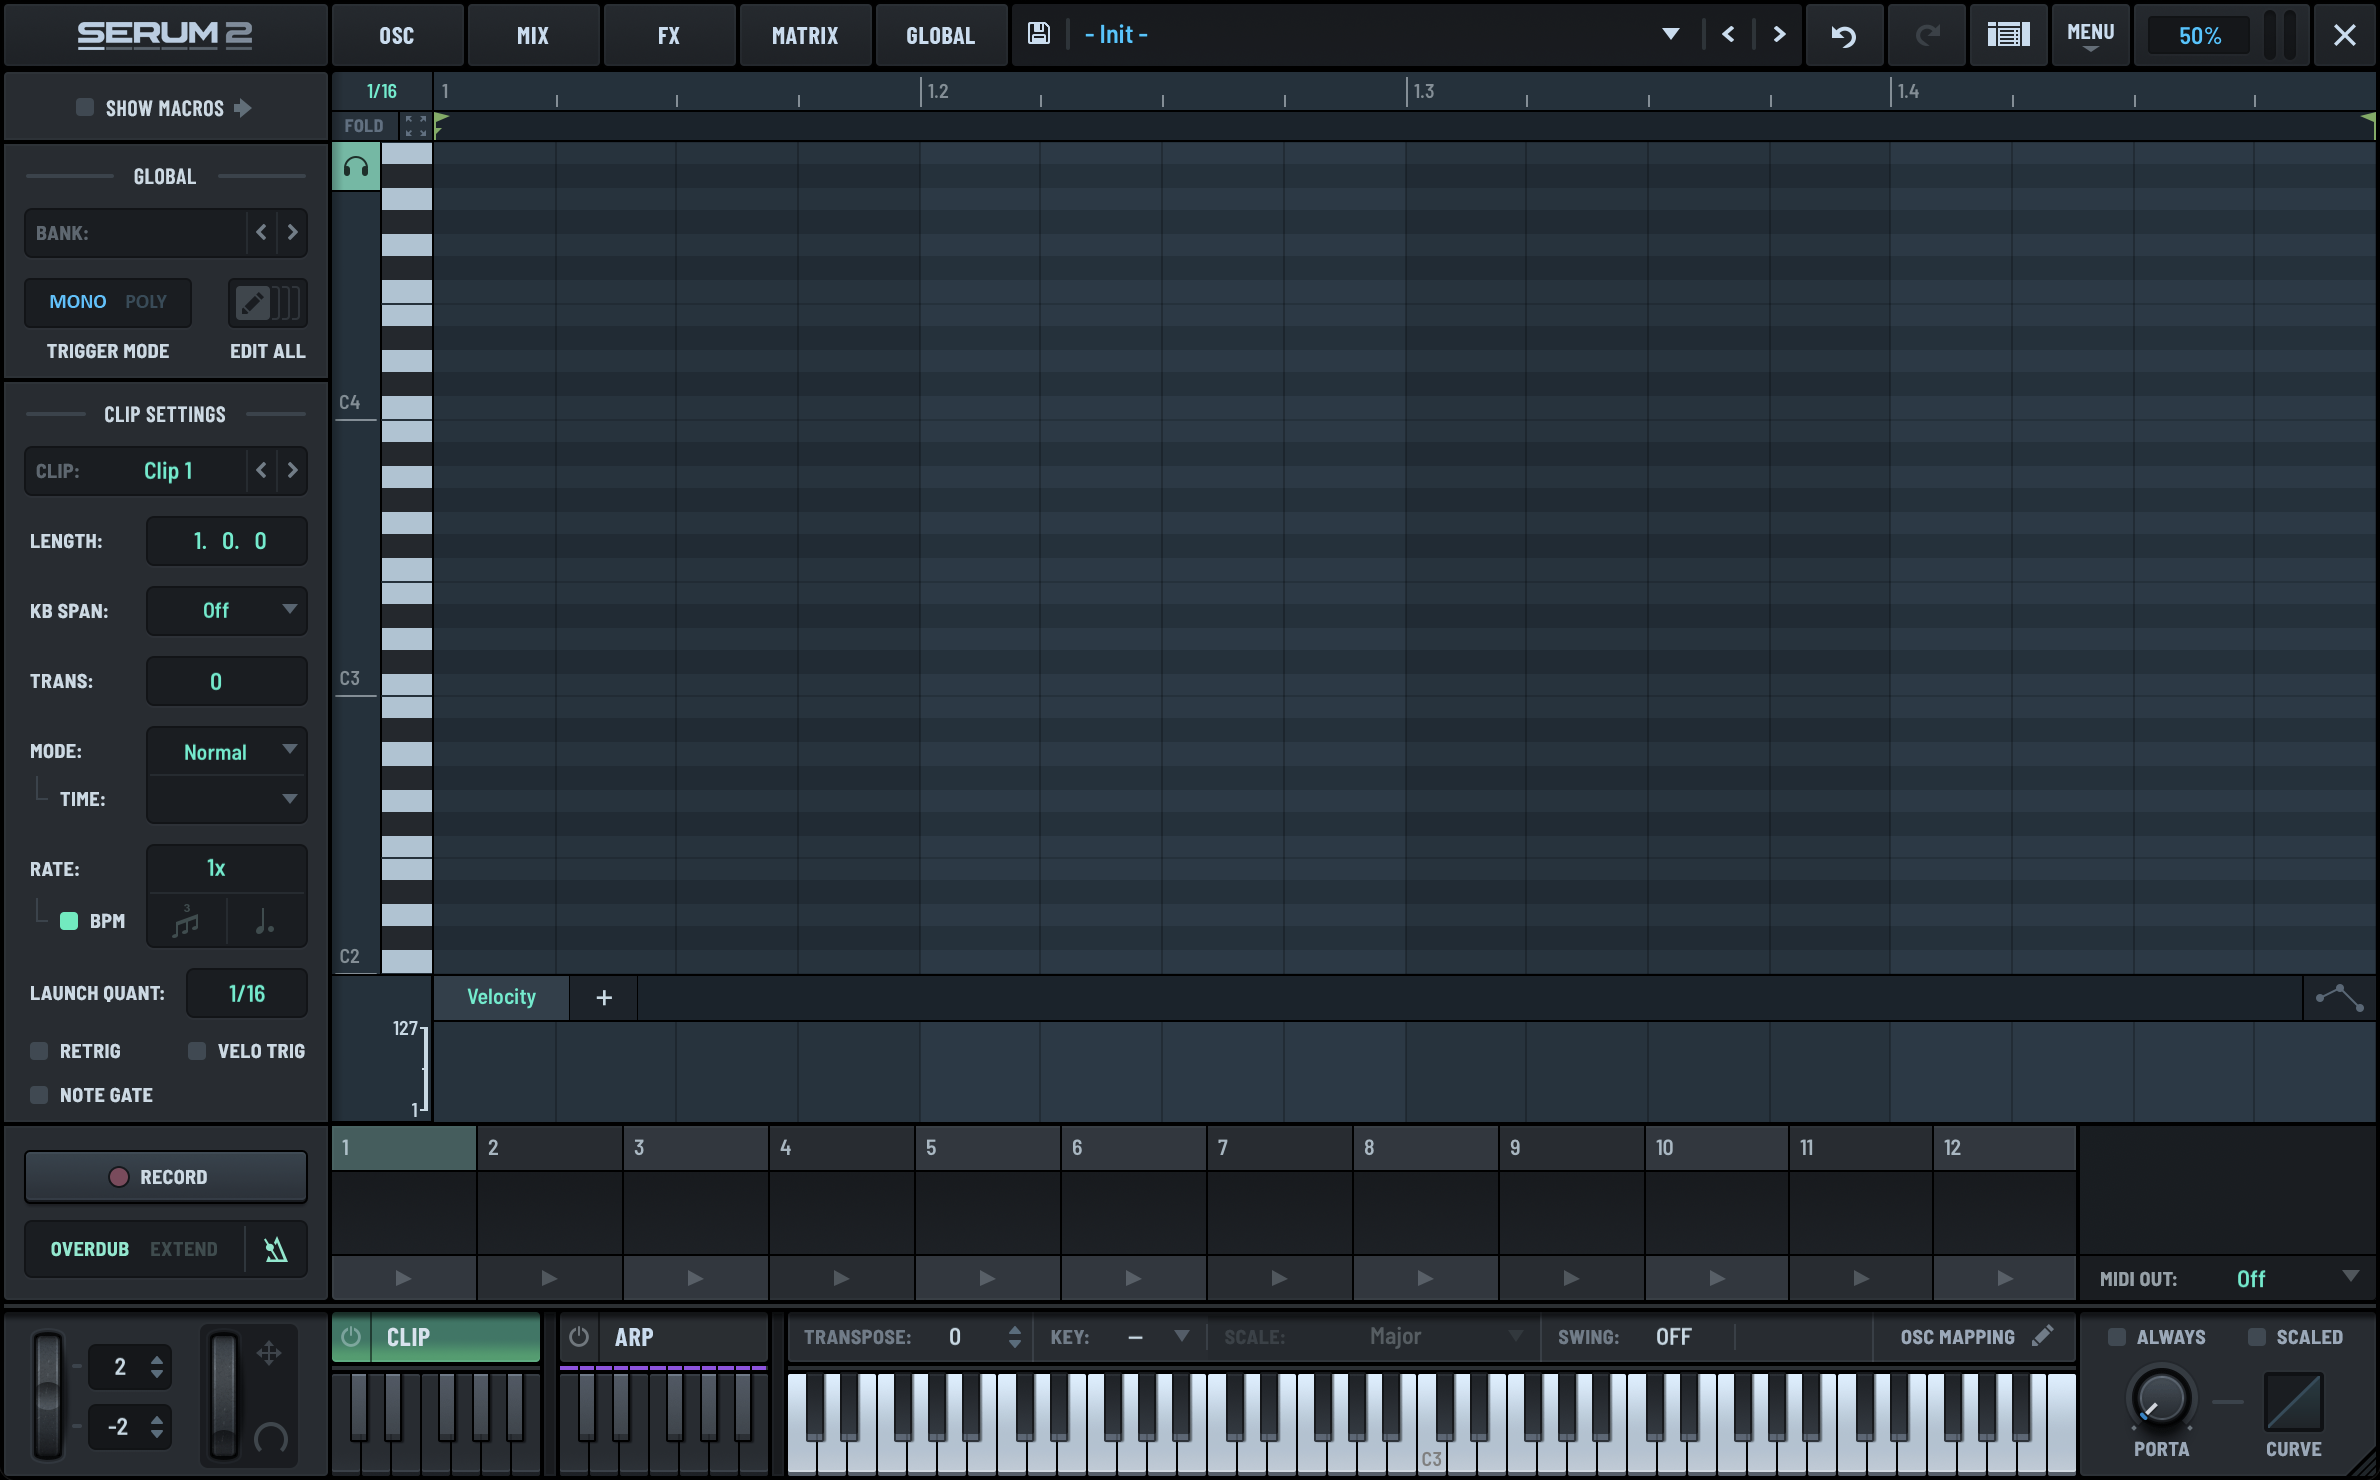
- Prepare the MIDI part.
- Create a MIDI part that represents the preset’s intent. Alternatively, drag an existing MIDI file into the clip module.

- Set the preview clip.
- Right-click the clip thumbnail and choose Set as Preview Clip in the context menu.

(Optional) Disable the CLIP module.
For cleaner workflow, you can disable the clip module after setting the preview. The clip remains as the preset preview in the browser.
Benefits for Users
When users browse presets in Serum 2, the custom clip will automatically play, providing an auditory representation of the preset. Additionally, the clip remains available if users want to utilize or modify it directly. By enabling the clip module, users can seamlessly integrate the preview clip into their projects.
Advanced Tip: Automating Macros in Clips
To further enhance the preview, consider automating macro knobs within the clip. This can showcase dynamic capabilities or highlight specific features of the preset.
Custom preset previews in Serum 2 not only make the browsing experience more engaging but also bridge the gap between creators and users, allowing the artistic intent to shine through.